Independent Project(Innerverse) : Title SEQ
As of this week, I completed my title sequence animation in After effects. This was a bit stressful for my PC but totally fun for me.
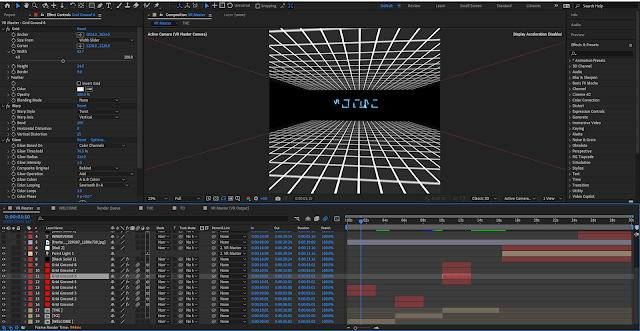
When I wore a VR headset for the first time I was standing on a grid and mapping the area for movement. This was the initial idea of grids. IN after effects, I made the 2K composition in 25 FPS in VR. Thereafter I started playing with grids I lay one on the ground and one on top and expanded it in all 3 dimensions after making that layer 3D. I animated both of the grids in Z-direction so it feels like it's going in the opposite direction of what the camera is facing I decided to add different parts of the title at the end of grids so it looks dramatic as we all see in most of the trailers. For the title Introduction, I chose the Neutrons demo font from the prospectus. I started experimenting with different effects and presets so I can get something unique and cool which looks modern enough and bright to support the theme of the project. I remembered suddenly that a 3rd part plug-in called sabre which was developed by Video-Copilot might come in handy because it can integrate into the text layer and make an effect on the border of the text layer.
As for the final title, I wanted something more dynamic, complex and semi-organic. I had to purchase a red giant plugin which is a great 3rd party plugin. Which can also work in other applications and not just after effects. I knew buying that would be worth it so I did. After installing the red giant I knew the trick of making a tunnel using MIR 3, I watched some more tutorial videos to get hands-on knowledge of making a tunnel in 3D. I started making a tunnel it was in shape really easily but the next part was tricky because I had to make a lot of changes to make it look like I wanted it to be. I changed the amplitude. evolution, occlusion and other countless things. As I came closer to what I wanted it to be.
I extended it along Z-axis and set my 3d camera at the beginning so I can animate it as we are going into the tunnel. It came out good but it was very flat so I added a Point light just in front of the camera so we see clearly and it does not look that flat after adding the point light I parented it to the camera so it follows along. And then I added the main title "INNERVERSE" Which is new and hopefully I won't get a copyright for this.
After adding the main title I added some heavy graphics and colours and glows at various places. I had to do it later because it was making the programme crash if I worked on it. I added glow to grids and tunnels. Afterwards, I exported it. It is 30 seconds long and I cant wait to see it in VR and take notes on how I should move forward with it although I have some ideas.


Comments
Post a Comment